Vibe Code and Deploy a Web Search AI Agent

Overview
In this tutorial, you'll build a complete Web Search AI Agent — a full-stack application with a Python FastAPI backend and React frontend that can search the web and provide intelligent answers to your questions. The agent uses an LLM to decide when web search is needed, extracts search queries, fetches real-time results via BrightData's SERP API, and synthesizes comprehensive answers using the RAG (Retrieval-Augmented Generation) pattern.
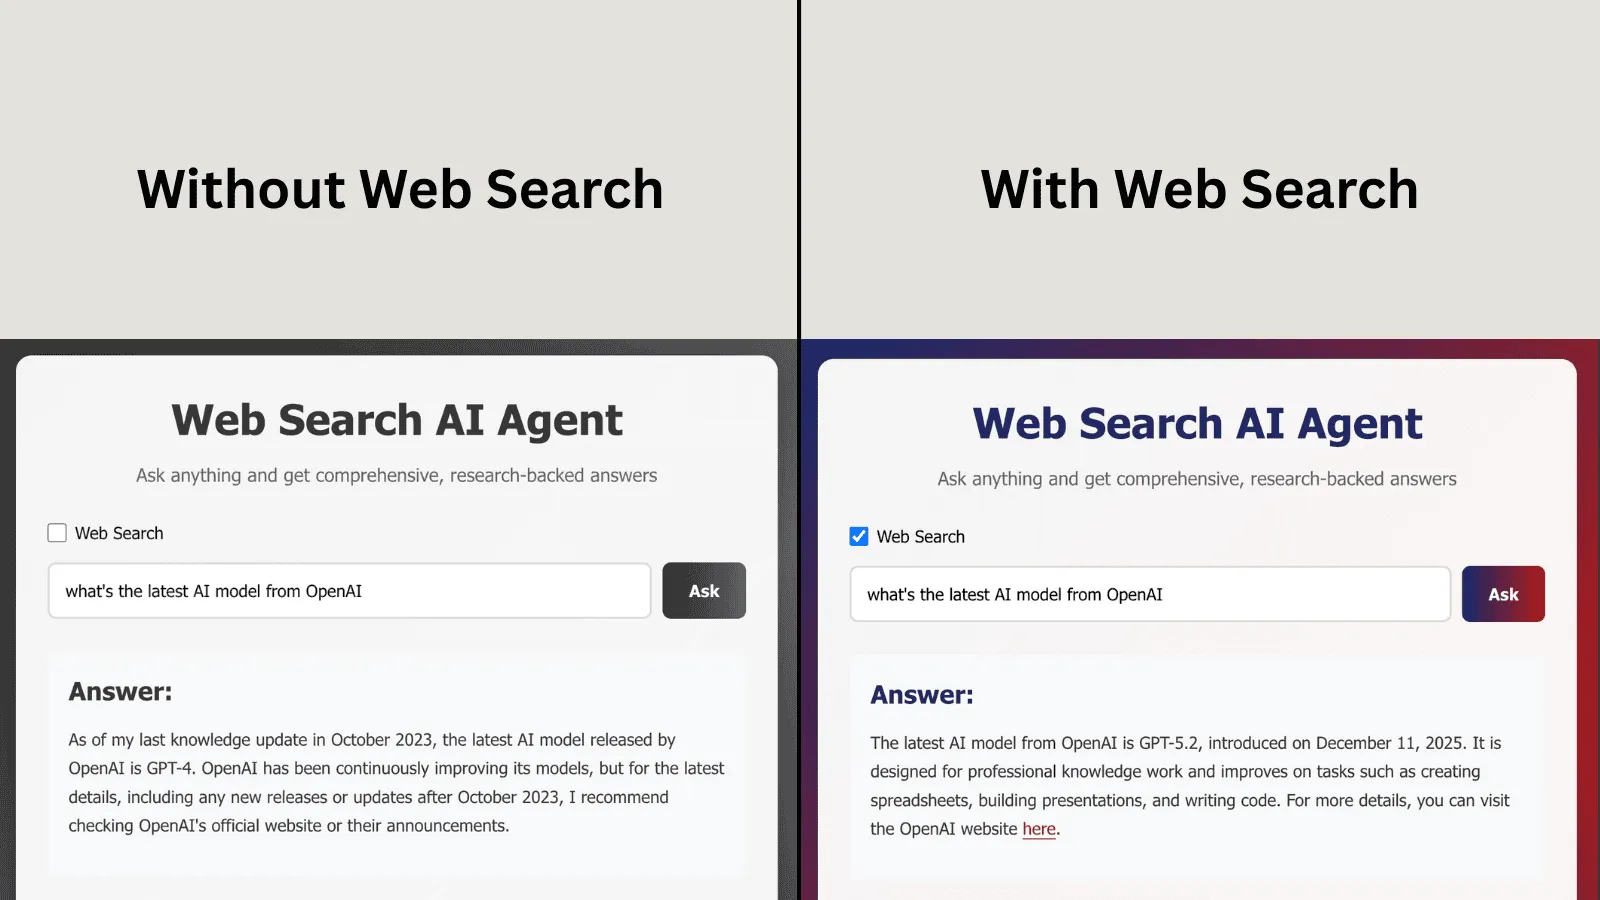
The application includes a user-controlled "Web Search" checkbox that lets you toggle between:
- Enabled: Agent searches the web using BrightData and synthesizes information
- Disabled: Agent relies only on the LLM model's knowledge without web search
┌─────────────────────────────────────────────────────────────────────┐
│                        USER INTERFACE (React)                        │
│                    "What are the latest AI news?"                    │
└──────────────────────────────────┬──────────────────────────────────┘
                                   │
                                   ▼
┌─────────────────────────────────────────────────────────────────────┐
│                      PYTHON BACKEND (FastAPI)                        │
│  ┌─────────────┐     ┌─────────────┐     ┌─────────────────────┐   │
│  │   Agent     │────▶│    LLM      │────▶│   Web Scraper       │   │
│  │ (Orchestrator)│    │  (Brain)    │     │ (BrightData SERP)   │   │
│  └─────────────┘     └─────────────┘     └─────────────────────┘   │
└─────────────────────────────────────────────────────────────────────┘
Prerequisites
Before starting, ensure you have:
- Python 3.10+ installed
- Node.js 18+ installed
- API Keys (will be provided at the workshop or get your own):
- Zeabur AI Hub - for LLM access (OpenAI-compatible API)
- BrightData - for web search capabilities
AI Coding IDEs
Choose your favorite AI-powered coding assistant. Such as Cursor, Claude Code, Open AI Codex, Windsurf, Replit, JetBrains AI Assistant, GitHub Copilot, Tabnine, Sourcegraph Cody, Amazon Q Developer, Aider, Cline, Qoder, CodeGeeX etc.
Workshop Setup
Step 1: Create Your Workspace
Open your terminal and create a new empty folder:
mkdir deep-research-agent
Step 2: Open the Folder in Your AI IDE
- Cursor: File → Open Folder
- VS Code + Copilot: File → Open Folder
- Windsurf: File → Open Folder
Step 3: Open the AI Chat Interface
- Cursor: Press
Cmd+K(Mac) orCtrl+K(Windows) for inline, orCmd+L/Ctrl+Lfor chat - GitHub Copilot: Click the Copilot icon or press
Cmd+I/Ctrl+I - Windsurf: Press
Cmd+L/Ctrl+Lfor Cascade
Vibe Coding Prompts
Follow these prompts in order. Copy each prompt into your AI coding assistant and let it generate the code!
> Note: These prompts include important technical details and fixes that ensure your implementation works correctly on the first try. The prompts may seem detailed, but this ensures you won't encounter common errors during development.
Prompt 1: Project Setup
> Goal: Set up the project structure
I want to build a deep research AI agent that can answer questions by searching the web when needed.

The backend will be Python and the frontend will be React. Set up a clean project structure with:
- A services folder containing backend and frontend directories
- A Makefile for running common commands

Just create the folder structure for now.
services/backend/folder createdservices/frontend/folder created- Empty
Makefilecreated
Prompt 2: Backend Setup
> Goal: Initialize the Python backend
Set up the Python backend in services/backend/.

I'll need:
- FastAPI for the web server
- An async HTTP client for making API calls
- Environment variable support
- Data validation

Create the requirements.txt with the necessary dependencies.
A requirements.txt file with FastAPI, uvicorn, httpx, python-dotenv, and pydantic.
Prompt 3: Environment Configuration
> Goal: Set up environment variables
I need to store API keys for two services:
1. Zeabur AI Hub - an OpenAI-compatible LLM API (token: ZEABUR_API_TOKEN)
2. BrightData - a web scraping service (token: BRIGHTDATA_API_TOKEN)

Create a .env.example template and a .env file in the backend folder. Also include a ZEABUR_MODEL variable defaulting to gpt-4o-mini.

Also create a config.py file that uses pydantic-settings to load these environment variables.
IMPORTANT: For the CORS_ORIGINS field, use Union[List[str], str] type and add a @field_validator to parse comma-separated strings from .env into a list. This prevents parsing errors.
.env.examplefile with placeholder values.envfile ready to be filled inconfig.pywith Settings class and CORS validator
Prompt 4: LLM Client
> Goal: Create a client to talk to the LLM
I need to communicate with Zeabur AI Hub, which is an OpenAI-compatible API.

Create a Python client in services/backend/llm.py that can:
- Send prompts and get responses
- Support conversation history (chat)
- Handle errors gracefully

The base URL is https://sfo1.aihub.zeabur.ai and it uses the standard OpenAI chat completions format. Use async/await for the HTTP calls.
A llm.py file with a class that can generate text and have conversations with the LLM.
Prompt 5: Web Search
> Goal: Create a web search capability using BrightData
I want to search the web using BrightData's SERP API.

Create a Python client in services/backend/scraper.py that:
- Takes a search query and returns Google search results
- Uses BrightData's API at https://api.brightdata.com/request
- Returns the parsed search results as JSON
- Handles errors without crashing

The API uses Bearer token authentication and needs these parameters:
- zone: "serp_api1"
- format: "json"
- data_format: "parsed_light"

IMPORTANT fixes to include:
1. Import and use urllib.parse.quote_plus to URL-encode the search query before building the Google search URL
2. Do NOT include a "language" parameter (BrightData rejects it)
3. BrightData returns response with structure {status_code, headers, body}. In _parse_search_results:
   - Check if data has a 'body' field and extract it
   - If body is a JSON string, parse it with json.loads()
   - Then look for 'organic' or 'organic_results' field for the search results
A scraper.py file with a class that can search the web and return results.
Prompt 6: AI Agent
> Goal: Build the intelligent agent that decides when to search
Now I need to build the AI agent that ties everything together.

Create services/backend/agent.py with an agent that:
1. Receives a user question
2. Uses the LLM to decide: "Does this need current information from the web?"
3. If yes: extracts search keywords, searches the web, then answers based on results
4. If no: answers directly from the LLM's knowledge

The agent should use the LLM client and web scraper we created. Add logging so I can see what the agent is doing at each step.

IMPORTANT: The answer() method should accept a use_web_search parameter (defaults to True).
If use_web_search is False, skip the web search decision logic entirely and go straight to answering from LLM knowledge.
An agent.py file with an intelligent agent that orchestrates LLM reasoning and web search.
Prompt 7: API Server
> Goal: Expose the agent as a REST API
Create a FastAPI server in services/backend/main.py that:
- Has a POST /api/query endpoint that accepts a question and returns the agent's answer
- Has health check endpoints (GET / and GET /health)
- Loads the API keys from environment variables using the config.py settings
- Enables CORS so the frontend can call it

The request should be {"query": "...", "use_web_search": true} and response should be {"answer": "..."}.

IMPORTANT: Do NOT use the deprecated @app.on_event("startup") and @app.on_event("shutdown") decorators.
Instead, use the modern approach:
1. Import asynccontextmanager from contextlib
2. Create a lifespan async context manager function that handles startup and shutdown
3. Pass it to FastAPI as: app = FastAPI(lifespan=lifespan)

This prevents deprecation warnings.
A main.py file with a FastAPI server exposing the agent.
Prompt 8: Frontend Setup
> Goal: Initialize the React frontend
Set up a React TypeScript frontend in services/frontend/ using Vite.

I'll need:
- React with TypeScript
- A markdown renderer (react-markdown with remark-gfm) to display formatted AI responses
- Environment variable support for the API URL

Create all the necessary config files (package.json, vite.config.ts, tsconfig.json, index.html) and the basic entry point files.
package.jsonwith React and markdown dependencies- Vite and TypeScript configuration files
index.htmlandsrc/main.tsxentry points.envfile withVITE_API_URL=http://localhost:8000
Prompt 9: User Interface
> Goal: Build the chat interface
Create the main React component in services/frontend/src/App.tsx.

I want a simple chat interface where users can:
- Type a question in an input field
- Click "Ask" (or press Enter) to submit
- See a loading spinner while waiting
- See the AI's answer rendered as markdown (with tables, lists, links, etc.)
- See their recent query history (last 5 questions)

Handle errors gracefully and show error messages to the user.
An App.tsx file with a complete chat interface component.
Prompt 10: Styling
> Goal: Make it look good
Create modern, professional CSS styling for the frontend in services/frontend/src/App.css.

I want:
- A gradient background (dark blue to red tones)
- A clean white card in the center for the content
- Nice input field and button styling
- A spinning loader animation
- Good typography for the markdown content (headers, lists, tables, code blocks)
- Mobile responsive design

Make it look polished and professional.
An App.css file with complete styling.
Prompt 11: Development Commands
> Goal: Create convenient commands for development
Create a Makefile in the project root with commands to:
- Install all dependencies (both backend and frontend)
- Run the backend server
- Run the frontend dev server
- Run both together

Make it easy to get started with just "make install" and "make dev".

IMPORTANT: Add command aliases so both of these work:
- make run-backend AND make dev-backend (both do the same thing)
- make run-frontend AND make dev-frontend (both do the same thing)

This ensures consistency with different naming conventions.
A Makefile with install and dev commands for both services.
Prompt 12: Add Web Search Toggle
> Goal: Add user control over web search functionality
Add a "Web Search" checkbox to the frontend that allows users to control whether the AI agent uses BrightData for web search.

Frontend changes (services/frontend/src/App.tsx):
- Add a checkbox state (useWebSearch) that defaults to true
- Add a checkbox UI above the input field with a clear label and description
- Send the checkbox state (use_web_search) in the API request body
- Update the loading message to show different text based on whether web search is enabled

Backend changes (services/backend/main.py):
- Update the QueryRequest model to accept an optional use_web_search boolean (defaults to True)
- Pass this parameter to the agent

Backend changes (services/backend/agent.py):
- Update the run() method to accept a use_web_search parameter
- If use_web_search is False, skip all web search logic and answer directly with the LLM
- Add logging to show whether web search is enabled or disabled

This feature lets users compare answers with and without web search.
- Updated
App.tsxwith a "Web Search" checkbox - Updated
main.pywith the new request parameter - Updated
agent.pywith conditional web search logic
Verification Steps
After generating all the code, verify your project structure matches:
deep-research-agent/
├── services/
│   ├── backend/
│   │   ├── .env
│   │   ├── .env.example
│   │   ├── agent.py
│   │   ├── llm.py
│   │   ├── main.py
│   │   ├── requirements.txt
│   │   └── scraper.py
│   └── frontend/
│       ├── src/
│       │   ├── App.css
│       │   ├── App.tsx
│       │   ├── index.css
│       │   └── main.tsx
│       ├── .env
│       ├── index.html
│       ├── package.json
│       ├── tsconfig.json
│       └── vite.config.ts
└── Makefile
Running the Project
Step 1: Configure Environment Variables
Edit services/backend/.env with your actual API keys:
BRIGHTDATA_API_TOKEN=your-actual-brightdata-token
ZEABUR_API_TOKEN=your-actual-zeabur-token
ZEABUR_MODEL=gpt-4o-mini
PORT=8000
Step 2: Install Dependencies
# Install all dependencies
make install

# Or install separately:
cd services/backend && pip3 install -r requirements.txt
cd services/frontend && npm install
Step 3: Start the Backend
make dev-backend
# Or: cd services/backend && python3 main.py
You should see:
✅ Environment loaded successfully
🔗 Connecting to Zeabur AI Hub: https://sfo1.aihub.zeabur.ai
🤖 Using model: gpt-4o-mini
🚀 Web Search AI Agent Server running on http://localhost:8000
Step 4: Start the Frontend (new terminal)
make dev-frontend
# Or: cd services/frontend && npm run dev
You should see:
VITE ready in XXX ms
➜  Local:   http://localhost:5173/
Step 5: Test the Application
- Open http://localhost:5173 in your browser
- You'll see a "Web Search" checkbox (checked by default)
- Type a question like "What are the latest developments in AI?"
- Click "Ask" and watch the magic happen!
Resources
- Zeabur AI Hub: https://zeabur.com
- BrightData: https://brightdata.com
Congratulations! 🎉
You've successfully vibe-coded a complete AI-powered research agent! This project demonstrates:
- ✅ Python async programming with FastAPI
- ✅ React frontend with TypeScript
- ✅ OpenAI-compatible API integration
- ✅ Web scraping with BrightData
- ✅ AI Agent architecture (ReAct pattern)
- ✅ RAG (Retrieval-Augmented Generation)
- ✅ User-controlled feature toggles
- ✅ Full-stack development with AI assistance
Next Steps
Want to extend your agent? Try these ideas:
- Add source citations showing which websites were used
- Implement streaming responses for real-time answers
- Add conversation memory to maintain context across queries
- Support multiple search engines (Google, Bing, DuckDuckGo)
- Add user authentication and query history storage
- Deploy to production (Zeabur, Vercel, Railway, etc.)
---
Technical Notes (For Instructors)
These prompts have been enhanced with specific technical details to ensure error-free implementation:
Built-in Fixes
- Prompt 3 - CORS validator using pydantic field_validator to parse comma-separated strings
- Prompt 5 - URL encoding with quote_plus, removed unsupported language parameter, BrightData response body extraction and JSON parsing
- Prompt 6 - use_web_search parameter for conditional search logic
- Prompt 7 - Modern FastAPI lifespan handler instead of deprecated on_event decorators
- Prompt 11 - Command aliases (dev-backend/run-backend, dev-frontend/run-frontend)
- Prompt 12 - Complete web search toggle implementation
Why These Fixes Matter
- CORS Validator: Prevents
SettingsErrorwhen loading environment variables - URL Encoding: Handles search queries with spaces and special characters
- Response Parsing: Correctly extracts search results from BrightData's nested response structure
- Lifespan Handler: Eliminates deprecation warnings in FastAPI 0.109+
- Command Aliases: Supports both naming conventions for better UX
Verification
After students complete all prompts, they can verify everything works by running:
make install
make dev-backend  # Terminal 1
make dev-frontend # Terminal 2
The app should start without errors and be fully functional at http://localhost:3000